
What is GlassFlow?
GlassFlow is an open-source platform for building real-time data pipelines.
If you’ve ever worked with data, you probably know that moving it around is rarely as simple as copying files. Data often comes from multiple sources, needs cleaning, and must be pushed into databases where it can be analyzed. That’s where tools like GlassFlow come in.
GlassFlow is a platform that helps you build real-time data pipelines. A pipeline is simply a path your data takes: from where it starts (the source), through any processing steps (like deduplication), to where it ends up (the sink).
With GlassFlow, you can:
- Connect to sources like Kafka.
- Transform or clean your data as it streams in.
- Write it efficiently into databases such as ClickHouse.
- Monitor everything from an easy-to-use web interface.
The best part is, you don’t need to write long scripts just to get started – GlassFlow is built to be approachable for beginners.
Ways to Install GlassFlow
There are several ways you could run GlassFlow, depending on your setup:
- Docker : The simplest method. You can spin it up locally with a single command using Docker Compose.
- AWS EC2: If you prefer running it in the cloud on a virtual machine.
- Kubernetes with Helm: For production teams that need scaling and orchestration.
For this guide, we’ll use Docker, because it’s the quickest way to get started.
Setting Up GlassFlow with Docker
Before we start, make sure you have three tools installed:
- Git (to download the project files).
- Docker (to run containers).
- Docker Compose (to manage multiple containers as a group).
If you don’t already have these installed, you can follow the official installation pages for each.
Step 1: Download the Project Files
Open a terminal and run:
git clone https://github.com/glassflow/clickhouse-etl.git
cd clickhouse-etl
git clone ...downloads the GlassFlow project from GitHub to your computer.cd clickhouse-etlchanges into the project folder so you can work from there.
Inside this folder is a file called docker-compose.yaml. This file describes all the services GlassFlow needs (like its backend, UI, and message broker).
Step 2: Start GlassFlow
Run:
docker compose up -d
After executing the above command, you should see something like this:
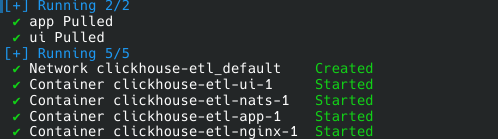
Here’s what happens:
- Docker Compose reads the
docker-compose.yamlfile. - It pulls down the required Docker images (the pre-built pieces of software GlassFlow depends on).
- It starts up all the services (backend, UI, NATS, nginx) so they can work together.
The first time you run this, it may take a few minutes while Docker downloads everything.
Step 3: Check What’s Happening
If you want to see what GlassFlow is doing in real time, open a new terminal in the same folder and run:
docker compose logs -f
This will show you the live logs of all the services. It’s a good way to confirm that everything started correctly.
Step 4: Make Sure It’s Running
To check the status of the containers, run:
docker compose ps
This will print a list of running services. You should see something like:
NAME        IMAGE                                  STATUS   PORTS
ui-1        glassflow/clickhouse-etl-fe:stable     Up       8080/tcp
app-1       glassflow/clickhouse-etl-be:stable     Up
nats-1      nats:alpine                            Up       4222/tcp
nginx-1     nginx:1.27-alpine                      Up       8080->8080/tcp
If they all show “Up,” then GlassFlow is ready.
Step 5: Open the Web UI
Now, open your browser and go to:
http://localhost:8080
This is the GlassFlow dashboard, where you can visually create and manage pipelines.
Step 6: Stopping GlassFlow
When you’re done experimenting, you can shut everything down with:
docker compose down
This stops the running containers but keeps the downloaded images, so you can start them again later.
If you want to completely reset everything (including deleting volumes and stored data), use:
docker compose down -v
Troubleshooting Common Issues
If you face problems while installing or running GlassFlow with Docker, here are some common issues and how to solve them:
1. Docker or Docker Compose Not Found
Error:
docker: command not found
docker compose: command not found
Fix: Docker or Docker Compose is not installed. Check versions with:
docker --version
docker compose version
If not found, install them from the official Docker website.
2. Permission Denied When Running Docker
Error:
permission denied while trying to connect to the Docker daemon socket
Fix: Run with sudo or add your user to the Docker group:
sudo usermod -aG docker $USER
newgrp docker
3. Port 8080 Already in Use
Error:
Error starting userland proxy: listen tcp 0.0.0.0:8080: bind: address already in use
Fix: Check which process is using the port:
lsof -i :8080
Stop that process, or edit the docker-compose.yaml file to map a different port (for example 8090:8080).
4. Services Fail to Start or Exit Immediately
Symptom: When you run docker compose ps, some containers show Exited.
Fix:
- Make sure you have at least 2 GB free memory.
- View detailed logs for the failing service:
docker compose logs <service-name> - Restart everything with the following command:
docker compose down
docker compose up -d
5. Cannot Access the Web UI
Problem: The browser does not show the GlassFlow dashboard at http://localhost:8080.
Fix:
- Verify services are running:
docker compose ps - Check logs for the
nginxservice:docker compose logs nginx - Ensure no firewall or VPN is blocking
localhost.
6. Resetting Everything
If something is broken and you want a fresh start:
docker compose down -v
docker compose up
The -v flag removes volumes, clearing all stored data and giving you a clean environment.
Wrapping Up
In this post, you learned:
- What GlassFlow is and why it’s useful.
- The different ways it can be installed.
- How to install and run GlassFlow locally using Docker.
- What each command does along the way.
Now that GlassFlow is up and running on your machine, the next step is to create your first pipeline through the Web UI – connecting a data source to a sink and watching it flow in real time.
Thinking Ahead with ClickHouse
Getting started with GlassFlow locally is a great first step. But when you move toward real-world use cases, you’ll likely want to connect GlassFlow with databases like ClickHouse. Running ClickHouse at scale involves more than just installation – it requires planning for deployment, handling migrations, and ensuring reliable performance in production.
If your team prefers not to manage these complexities in-house, Quantrail Data offers managed ClickHouse services, migration assistance, and dedicated support to simplify operations and let teams stay focused on analytics instead of infrastructure.
References
https://www.pexels.com/photo/monochrome-photo-of-coffe-beside-a-laptop-12200696